Tickets and Tax Receipts
Important Reminder
For ticketed events, any tax receipts issued for ticket sales ( or for donations made through the events page) contain your charity logo and authorizing signature, making your charity the legal issuer of any/all tax receipts.
As part of the service agreement, your charity is responsible for ensuring compliance with the Income Tax Act (Canada), all applicable laws and Canada Revenue Agency guidance. Learn More.
Tax Receipting Option
1. Decide if you will be issuing a tax receipt for ticket sales or not. If so, choose between Instant tax receipt or Post-Event tax receipt.
TIP: Don’t know if you should issue a tax receipt for your event tickets? Learn more about charitable receipting and taxation laws.
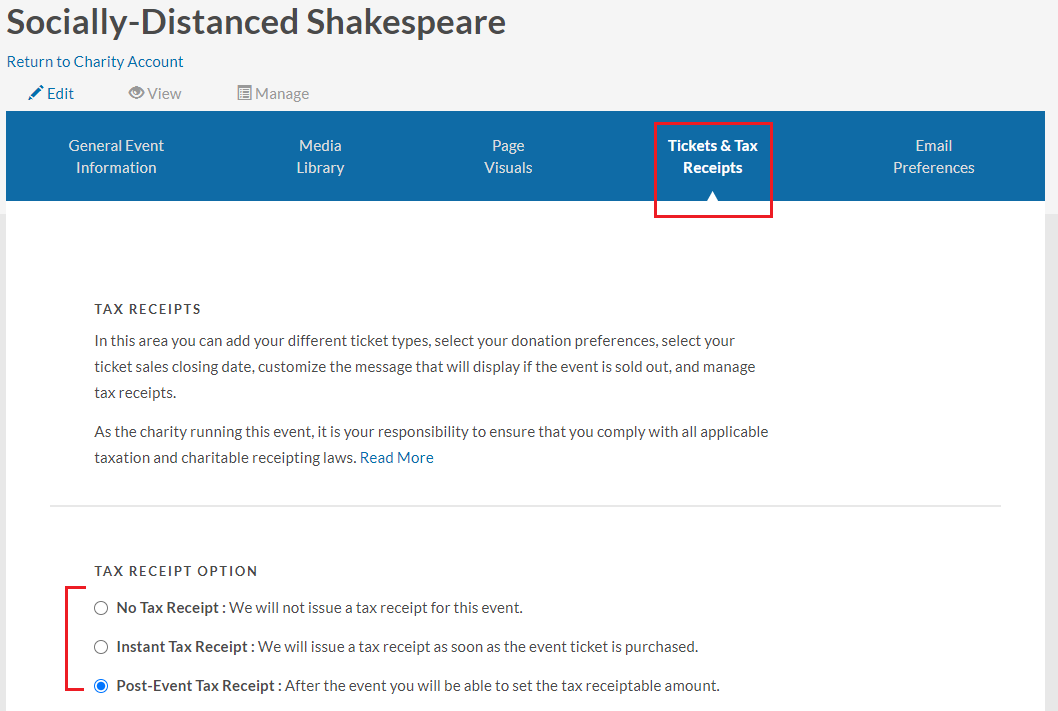
NOTE: If you’re running a free/paid ticketed event where the advantage received by the purchaser is such that a charitable tax receipt does not apply, simply choose the “No Receipt” (or, for a specific ticket where a tax receipt does not apply, enter $0 as the amount eligible for a tax receipt). We don’t send a $0 value tax receipt, nor do we notify the purchaser that a tax receipt won’t be issued.
2. Upload an image of the signature of a representative from your charity authorized to sign charitable tax receipts.
3. Upload an image of your charity’s logo as appears on your charity’s tax receipts.
NOTE: Because your event may also accept donations, both of these steps are required even if you will not be issuing tax receipts for registration tickets.
![]()
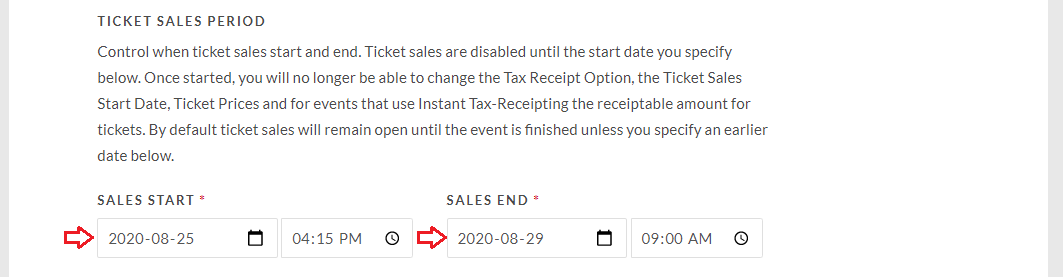
4. Set a date for when tickets will go on sale and when sales will end. Ticket sales are disabled until the start date you specify below.
NOTE: Once started, you will no longer be able to change the Tax Receipt Option, the Ticket Sales Start Date, Ticket Prices, and (for events that use Instant Tax-Receipting) the receiptable amount for tickets.
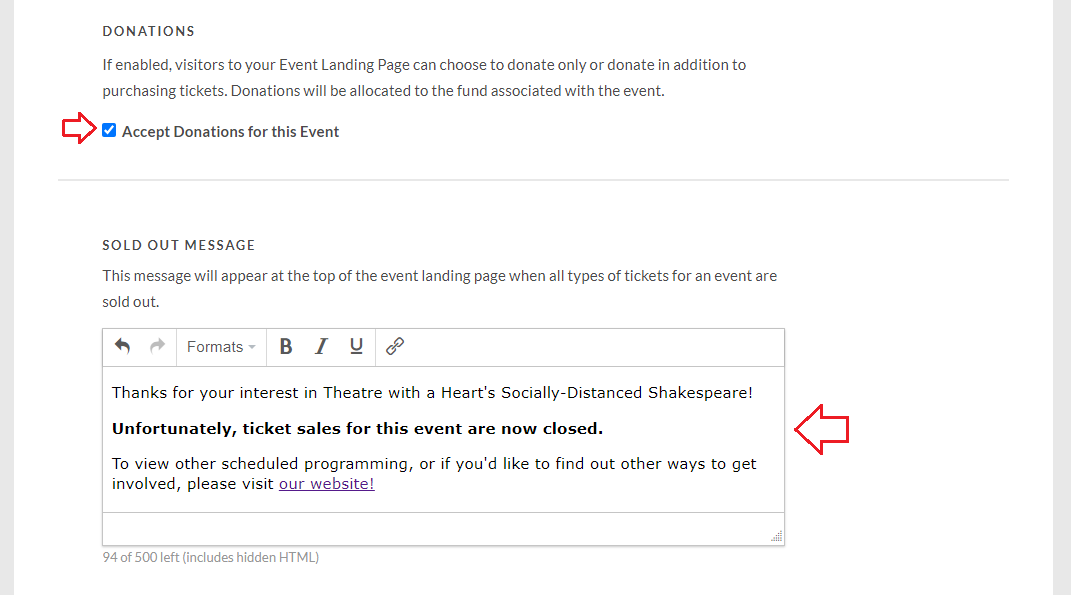
5. Decide if you’d like to allow purchasers to make a donation to your charity (within the same transaction).
NOTE: Donations are tax-receipted instantly for the full donation amount (bearing your charity’s logo and signature).
6. Add a customized Sold Out message that will replace your ticket list once all types of tickets are either sold out or hidden.
7. Select Collect Attendee Information to collect the first name, last name, and email for each attendee. We will then send each attendee their ticket, as well as reminder notifications. If disabled, the purchaser will need to send each attendee their ticket.
NOTE: If you need to ask Custom Questions of your attendees, you must check off this option.
8. Select Collect Purchaser Phone Number to make this a required field for purchasers.

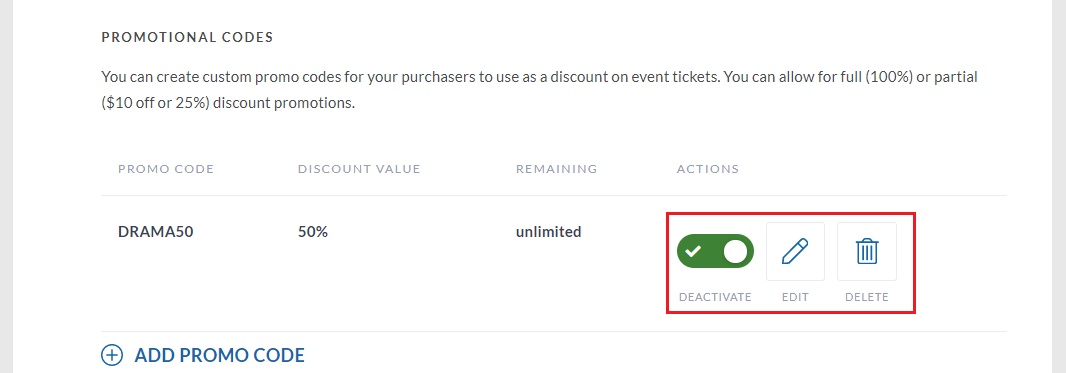
Promotional Codes
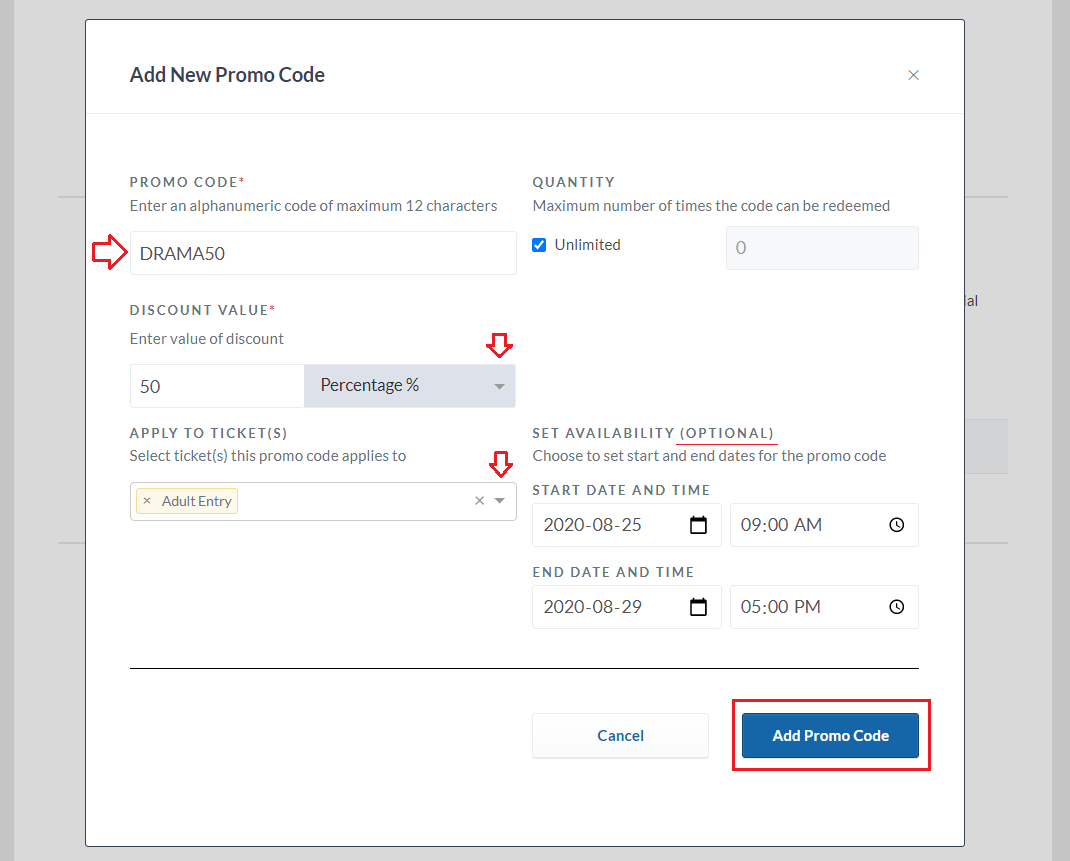
9. Add Promo Codes to give your purchasers a discount on select event tickets. Choose between a discount amount or percentage. Click “Add Promo Code”.
TIP: Want to give out select free tickets? You can create a full (i.e., 100% off) discount promotion.

a) In the pop-up window, fill out the details of your new promotional code, including a unique alphanumeric name, the number of times the code can be redeemed, the discount percentage or dollar value, the ticket types the promotional code can be applied to.
TIP: Want to have your promo code available for a limited time? Set the availability start and end date.
b) Once added, all codes will be listed in the Promotional Codes section, where you can view code details, and deactivate, edit, or delete each code. At any time, you can delete promotional codes that haven’t been redeemed.
NOTE: Once a promo code has been redeemed, you can no longer edit the code name, value or the tickets it applies to, but you can deactivate a redeemed code to continue selling tickets at full price.
Creating Your Ticket Types
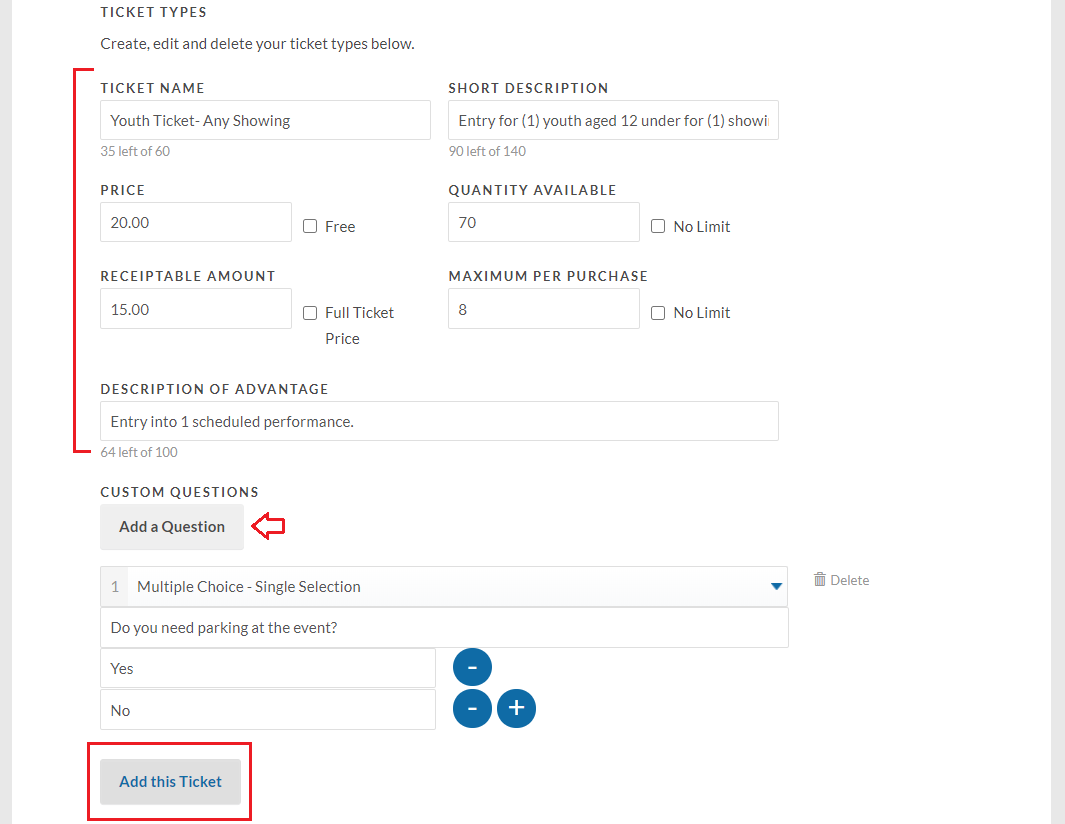
10. Scroll down to the Ticket Types subsection and fill out the appropriate fields for your ticket/s. When done, click ‘Add this Ticket’. There is no limit to the amount of ticket types you can have.
You can sell multiple ticket types including free and paid ticket types. You can also set the total number of tickets available for sale (quantity available) and the maximum number of tickets that can be purchased in a single transaction (maximum per purchase).
TIP: Need to ask questions of your attendees (e.g., menu option, parking required, etc.)? Use the “Add a Question” button.
11. Once added, you’ll see any/all tickets listed at the bottom of your screen, where you can Edit, Hide or Delete them as needed.
NOTE: Hiding a ticket will remove it from the list of tickets for sale on your event page.
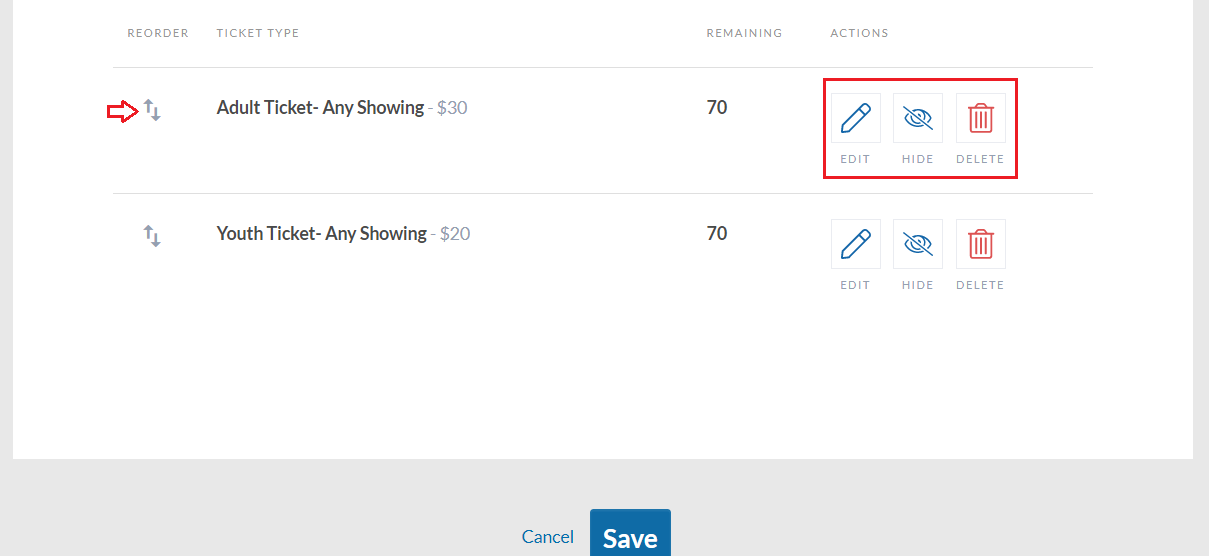
TIP: Use the Reorder feature to change the order in which tickets are displayed on the page.
FAQ
Can I change the total number of tickets available after I’ve launched my event?
You can set the number of tickets available when you create a new ticket type. Each time a ticket is sold, the number of remaining tickets available is reduced accordingly. You can increase or decrease the number of tickets available at any time. That said, once a ticket is sold, functionality is not provided to void that ticket or to facilitate return of that ticket.
Can I change the ticket sales price after I’ve launched my event?You can change the ticket price if no tickets have been sold. Once the ticket start date has begun, you can reduce the number of tickets available such that the ticket type shows as sold out. You can then add a new ticket type offering the same features as the old ticket type at the desired price.
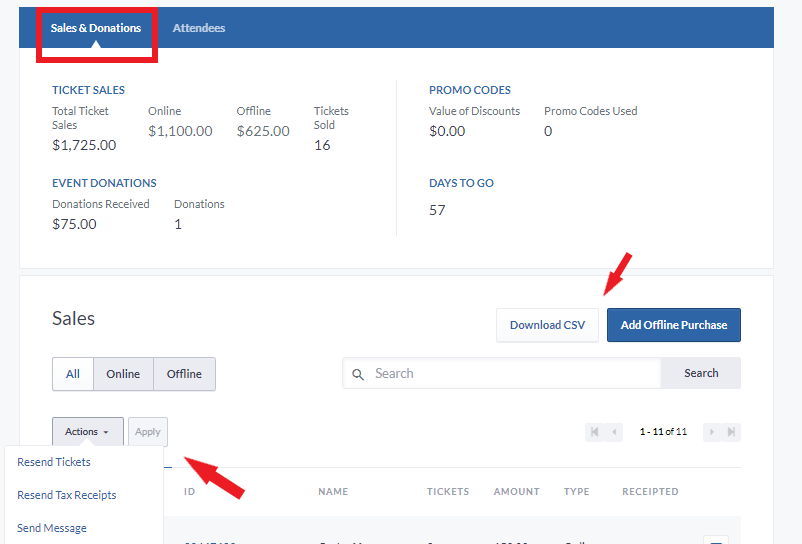
How and when do I receive ticket sales and donation proceeds made through my event?Proceeds from ticket sales and donations made through your event page, less the applicable CanadaHelps fees, are disbursed as part of our standard CanadaHelps disbursement practices. Learn More.
Do ticket sales and donations made through my event show in my standard CanadaHelps donation report?
—-> Learn about the Email Preferences tab